Posted (Updated ) in Uncategorized

Occasionally after running a brew update && brew upgrade I’ll attempt to start apache with sudo apachectl start and get the error


[Thu Jan 25 08:53:02.769633 2018] [core:warn] [pid 41502] AH00111: Config variable ${APACHE_LOG_DIR} is not defined
[Thu Jan 25 08:53:02.769654 2018] [core:warn] [pid 41502] AH00111: Config variable ${APACHE_LOG_DIR} is not defined
AH00543: httpd: bad user name ${APACHE_RUN_USER}

I also notice OSX’s built in apache is running instead of homebrews. But where should the envvars file go?


The Fix

Firstly disable OSX’s built in apache:

1
sudo launchctl unload -w /System/Library/LaunchDaemons/org.apache.httpd.plist

Drop your envvars file in /usr/local/Cellar/httpd/2.4.*/bin folder replacing the * with your version number.

You should now be able to sudo apachectl start again.

Read More »

Posted in Uncategorized

For a while now I’ve been having an issue where when I plug my headphones into the headphone jack of my Logitech 5.1 PC speakers, some YouTube and Facebook videos wouldn’t have sound, but most would.

I found this Reddit thread on the topic however the best solution seemed to be:

Hopefully everyone has fixed this by now, however I fixed this by changing my Realtek settings from 7.1 to stereo. – VeryRedChris

I went poking around in my sound settings (Windows 10) and made the following adjustment: Sound – Playback Devices – Speakers (Realtek High Definition Audio) – Properties – Spatial Sound and set Spatial sound format to Windows Sonic for Headphones and made sure Turn on 7.1 virtual surround sound checkbox was checked. This fixed the issue! If you have Chrome open, restart it and any other existing audio apps for the changes to take affect.

Read More »

Posted in Uncategorized

Our firewall at work restricts us to only port 80 and no access to SSH – which as you can imagine for a web developer is a pretty big issue. Below I’ll describe the various methods of routing around this crap.


Create a SOCKS5 Proxy with SSH

If your firewall restricts which sites you can visit but you have access through SSH to a remote server, route your browser and other traffic through that server with a SOCKS5 proxy. This is called Dynamic Port Forwarding:

1
ssh -f -N -D 1080 remote-server

The above command creates a SOCKS5 proxy server on port 1080 of your machine which sends all traffic through remote-server. 

Use it with you browser:

Now use the server in Firefox:

  • go to Edit -> Preferences -> Advanced -> Network -> Connection -> Settings…
  • check “Manual proxy configuration”
  • make sure “Use this proxy server for all protocols” is cleared
  • clear “HTTP Proxy”, “SSL Proxy”, “FTP Proxy”, and “Gopher Proxy” fields
  • enter “127.0.0.1” for “SOCKS Host”
  • enter “1080” (or whatever port you chose) for Port.

Use it with git:

You can also configure SSH git origins to work with your proxy:

Open ~/.ssh/config and add

1
2
3
Host bitbucket.org
    User git
    ProxyCommand nc -x localhost:1080 %h %p

Now you can just clone/push/pull as normal. See here for more information.

Read More »

Posted (Updated ) in Uncategorized

Recording a gif on OSX is fairly easy but you’ll need a few tools to make it happen – especially if you want a nice, small filesize for online viewing.


Step 1 – Record a video

You can use anything for this – I was recording a window on my screen so I used Screenium but Quicktime works fine. The output was a 15 second 1.1MB MOV file of resolution 1184×738. I saved the file as demo.mov on my desktop.


Step 2 – Convert to a Slideshow of PNGs

  • 1
    
    brew install ffmpeg #if you don't already have it
  • 1
    
    mkdir output
  • 1
    
    ffmpeg -i demo.mov -vf scale=iw:ih -r 10 output/ffout%3d.png
    • ‘scale=iw:ih’ – Don’t change the input scale. You can also set this to specific values or ‘320:-1’ to rescale down for example
    • ‘-r 10’ – Set to 10 FPS
    • ‘output/ffout%3d.png’ output slideshow of pngs in output folder


Step 3 – Convert the Slideshow to a GIF

From our PNG slideshow we can generate a (huge) gif. Don’t worry, we’ll fix the filesize later.

  • 1
    
    brew install imagemagick #if you don't already have it
  • 1
    
    convert -delay 8 -loop 0 output/ffout*.png output/demo.gif
    • ‘convert’ is the command-line tool from ImageMagick
    • ‘-dalay’ is the delay of 8, you would get a FPS=100/8=12.5
    • ‘-loop’ adds Netscape loop extension to your GIF animation
    • ‘output/ffout*.png’ is the directory and file names going into the GIF
    • ‘output/animation.gif’ is the final location and GIF output


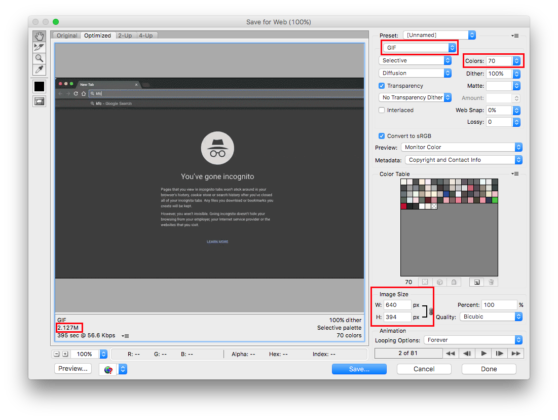
Step 4 – Optimise your GIF with Photoshop

  • Drag your new gif into Photoshop. Here you can make any changes such as removing frames. Turning on Window – Timeline will help here.
  • File – Save for Web and select GIF from the image type drop down at the top right
  • Tweak your Image Size and Colors values until you get the filesize you want (shown at bottom left). You can preview the GIF in realtime using the media buttons at the bottom right.
  • If the filesize is still too large, return to step 2 and lower your gifs FPS by lowering the r value.
  • Optimising your GIF with Photoshop


References

Read More »

Posted in Uncategorized

I have a folder of MKVs with audio tracks I don’t need. To remove them all at once without needing to reencode every file, we can use the mkvmerge tool from MKVToolnix. This is done in two steps:


Determine which tracks you want to keep

Use mkvinfo to list all tracks and their IDs so you’ll know which you want to keep:

1
mkvinfo -g your_file.mkv

You’ll need a list of track IDs you want to keep.

In the event that some of your MKVs have a different number of tracks to others, you’ll want to do something like the following:

1
for f in *.mkv; do echo "$f" && mkvinfo "$f" | grep "mkvextract: 10"; done

The above will find all MKVs with 10 tracks. In my case I grouped all the MKVs with 10, 8 and 7 tracks into individual folders then performed the below step on each folder.


Remove the tracks from each file

Use the following command to create a copy with a v2 suffix of each MKV. This is a safe way to ensure your changes are correct without deleting the original files.

1
for f in *.mkv; do mkvmerge -o "${f%.mkv} v2.mkv" -a 0,1,2,9,10 "$f"; done


That’s it! When you’re done, delete your original files and remove the v2 suffix from your new ones.

Read More »

Posted (Updated ) in Uncategorized

JQuery UI supports a really handy feature called content via AJAX whereby when you click/display a tab, it will create a div element to load your content into, then perform the AJAX call and drop it in. But what happens when you want to specify the element to load the AJAX request into? Thankfully after a bit of digging around it’s not only possible, but pretty easy.

Here’s an example of AJAX load with JQuery UI Tabs:

1
2
3
4
5
6
7
<div id="tabs">
    <ul>
        <li><a href="ajax-content-1.html">Tab 1</a></li>
        <li><a href="ajax-content-2.html">Tab 2</a></li>
        <li><a href="ajax-content-3.html">Tab 3</a></li>
    </ul>
</div>

And here’s how you can specify the panel elements. Simply add an aria-controls attribute to your tab LI element that points to the ID of your target panel element:

1
2
3
4
5
6
7
8
9
10
11
<div id="tabs">
    <ul>
        <li aria-controls="my-first-tab"><a href="ajax-content-1.html">Tab 1</a></li>        <li aria-controls="my-second-tab"><a href="ajax-content-2.html">Tab 2</a></li>        <li aria-controls="my-third-tab"><a href="ajax-content-3.html">Tab 3</a></li>    </ul>
 
    <div id="my-first-tab"></div>    <div id="my-second-tab"></div>    <div id="my-third-tab"></div></div>


Demo

Read More »

Posted (Updated ) in Uncategorized

If you refresh or come back to a site often, it’s handy to have JQuery UI tabs remember which tab you were last on as you left. This simple script will handle that for you:

1
2
3
4
5
6
7
8
9
10
11
12
13
14
15
16
17
18
19
20
21
22
23
jQuery(function($) {
    var index = 'qpsstats-active-tab';
    //  Define friendly data store name
    var dataStore = window.sessionStorage;
    var oldIndex = 0;
    //  Start magic!
    try {
        // getter: Fetch previous value
        oldIndex = dataStore.getItem(index);
    } catch(e) {}
 
    $( "#tabs" ).tabs({        active: oldIndex,
        activate: function(event, ui) {
            //  Get future value
            var newIndex = ui.newTab.parent().children().index(ui.newTab);
            //  Set future value
            try {
                dataStore.setItem( index, newIndex );
            } catch(e) {}
        }
    });
});

No other code is necessary. Add your tab markup as you normally would (Remember to give it a matching ID):

1
2
3
4
5
6
7
8
9
10
11
12
13
14
15
16
<div id="tabs">	<ul>
		<li><a href="#tabs-1">Tab 1</a></li>
		<li><a href="#tabs-2">Tab 2</a></li>
		<li><a href="#tabs-3">Tab 3</a></li>
	</ul>
	<div id="tabs-1">
		first tab
	</div>
	<div id="tabs-2">
		second tab
	</div>
	<div id="tabs-3">
		third tab
	</div>
</div>


Demo

Read More »

Posted in Uncategorized

If you have a bunch of MP4 files and want to convert to MKV without needing to reencode each file, this can be done with a super handy little tool called avconv.

Install avtools

You’ll need homebrew for this step.

1
brew install avtools


Do the conversion

I have a folder of MP4 files. To bulk convert them:

1
for f in *.mp4; do avconv -i "$f" -codec copy -map 0 "${f%.mp4}.mkv"; done

The above will create identically named MKVs next to your MP4s. Once you’re happy, just delete all your MP4s.


Bonus: Bulk merge ASS subtitles

If you have identically named ASS subtitle files next to your shiny new MKVs, you can bulk merge them using mkvmerge from mkvtoolnix with:

1
2
brew install mkvtoolnix
for f in *.mkv; do mkvmerge -o "./muxed/$f" "$f" "${f%.mkv}.ass"; done

Thanks to user MestreLion for his answer on AskUbuntu.

Read More »

Posted in Uncategorized

Spent an hour grappling with this last night. Here’s how to get the PS3 controller working on Yosemite.

Pair the PS3 controller with your mac:

It seems Yosemite’s bluetooth device list is a little buggy and devices can show in the top bar bluetooth drop down but not in the system configuration bluetooth page for some devices. The PS3 controller is one of these devices.

After a while digging around the net I found some working instructions thanks to user DillingerEscapeHam on Reddit:

  • Plug PS3 controller into laptop
  • See Bluetooth device in status bar menu (though just a bt address, not named “Playstation Controller”)
  • Click to Connect device in status bar menu
  • Open System Preferences
  • No device listed
  • Unplug controller
  • Attempt to turn controller on without cable (no response, no flashing lights)
  • Controller was now listed correctly as Playstation controller in status bar menu and was listed as Connected
  • Disconnect controller via menu.
  • Unplug and start controller with PS button. It connects correctly.

After you get the controller paired you’ll need either a game that supports the controller or an app like Joystick Mapper (paid) or Enjoy2 (free) which allows binding of keyboard keys or mouse buttons/swipes to controller events. I recommend forking out the $6 for Joystick Mapper, as I’ve had issues with sensitivity on Enjoy2.

That should be all there is to it. I’m currently playing Hearthstone with a PS3 controller on Yosemite just fine!

Read More »

Posted (Updated ) in Uncategorized

It’s a pretty common problem. You have a file titled firefly – 02 – the train job.mkv when it should be Firefly – 02 – The Train Job.mkv. It’s slow and arduous to rename manually especially if you have a lot of files so below is a single command to do it all for you!

1
rename "s/ ([a-z])/ \U\1\E/g" *.mkv

In the above example:

  • \U means uppercase
  • \1 means the first match (in our case that’s the first alpha after a space)
  • \E means end uppercase
  • *.mkv applies the rename command to all files ending in .mkv in the current folder.

Thanks to akf from stackoverflow for his helpful answer on this one.

Read More »