Posted (Updated ) in Uncategorized

Creating custom widgets with the Widgets module for Lemonstand is a quick and painless process. Below, I’ll describe how to build a widget for Lemonstands Contact module. I’ll call this module Simple Contact Widget.

Download the completed module from my GitHub repo.

While this tutorial will go over everything you need to do to build a complete and working module, it would be very beneficial to also know the basics of module development, naming conventions and so on. Take a look at the documentation Developing LemonStand Modules if you haven’t already done so.

Read More »

Posted in Database, PHP

Here’s a very quick set of SQL snippets for updating a WPMU domain. This might be useful when building a site on a development domain before moving to a production one later on.

Firstly update the wp_blogs table:

1
UPDATE wp_blogs SET domain='newdomain.com';

There will be a bunch of wp_options and wp_posts tables – one per site. Find all the tables:

1
2
SHOW TABLES LIKE "%_options";
SHOW TABLES LIKE "%_posts";

and for each table, perform the following query:

1
2
3
4
#_options tables
UPDATE <tablename> SET option_value=REPLACE(option_value, 'http://olddomain.com', 'http://newdomain.com');
#_posts tables
UPDATE <tablename> SET post_content=REPLACE(post_content, 'http://olddomain.com', 'http://newdomain.com');

This was enough to get the sites working for me. Additional tweaks are probably required afterwards – if you find anything let me know in the comments below.

Read More »

Posted in Javascript

Preface: These APIs are still quite new and subject to change. As of the time of writing, the following tutorial works in Chrome 18.0.1025.168. Firefox 12 supports full screen but not mouse lock.

I’ve been having a little play with some HTML5 features and worked up an example of Pointer Lock and Full Screen APIs. As it stands at the moment, pointer lock is tightly coupled with full screen, so you won’t be able to use it without first loading up full screen mode.

You’ll need to enable Enable Pointer Lock in about:flags in Chrome then restart the browser for mouse lock to work.

You may request full screen mode like so:

1
2
3
4
5
6
element.requestFullScreen =
	element.requestFullScreen    ||
	element.mozRequestFullScreen ||
	element.webkitRequestFullScreen;
 
element.requestFullScreen(element.ALLOW_KEYBOARD_INPUT);

Once in full screen mode, pointer lock should become available:

1
2
3
4
5
6
7
8
9
navigator.pointer = navigator.pointer || navigator.webkitPointer;
navigator.pointer.lock(element,
	function() {
		console.log('Pointer lock');
	},
	function() {
		console.log('No pointer lock');
	}
);

Note in the above two scripts, element is a DOM element

Check out the working demo here. I’ve also added some JS to determine the direction the locked pointer is travelling and output the data to the screen. View page source for details.

Read More »
Posted in Linux

If you’re a Ubuntu user, you may be familiar with ppa-purge. It’s a handy little automated script to remove a PPA and roll back the version of any apps installed from that PPA. Debian doesn’t have this nicety by default but there’s a relatively simple way to get something close.

Firstly, remove your PPA from /etc/apt/sources.list or from the /etc/apt/sources.list.d/ directory.

Do an update:

1
sudo apt-get update

Find any packages that are now obsolete:

1
aptitude search '?obsolete'

For me this returned the following:

# aptitude search '?obsolete'
i A libmysqlclient18      - MySQL database client library                                                                           
i A mysql-client-5.5      - MySQL database client binaries                                                                          
i A mysql-server-5.5      - MySQL database server binaries and system database setup                                                
i A mysql-server-core-5.5 - MySQL database server binaries                                                                          
i A ruby-passenger        - Rails and Rack support for Apache2 and Nginx

Now just remove the listed packages with apt-get remove and reinstall as necessary. It’s not quite the automated tool that ppa-purge is, but it’s a pretty good start.

Read More »

Posted in Linux

I’ve been getting alot of frozen messages with Exim and needed to find out what they were so figured I’d document a few handy commands for doing so:

List messages in queue:

1
exim -bp

Show message header/body:

1
2
exim -Mvh <id> #For header
exim -Mvb <id> #For body

Delete all messages in queue:

1
exim -bp | exiqgrep -i | xargs exim -Mrm

Read More »

Posted (Updated ) in Linux

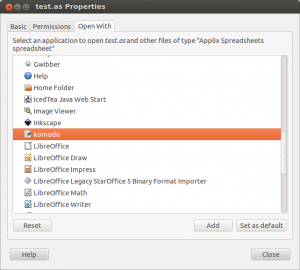
It seems Gnome 3 removed the button allowing users to add specified applications into the ‘Other Applications’ list under ‘Open With’ in file properties. Until the functionality is restored, you can add applications manually by doing the below:

cp /usr/share/applications/gedit.desktop ~/.local/share/applications/your_app.desktop

Modify the contents of your_app.deskop to look something like the below:

[Desktop Entry]
Name=your_app
GenericName=Your App
Comment=Edit text files
Keywords=Plaintext;Write;
Exec=your_app %U
Terminal=false
Type=Application
StartupNotify=true
MimeType=text/plain;
Icon=/path/to/icon.png
Categories=GNOME;GTK;Utility;TextEditor;
Actions=Window;Document;
X-Ubuntu-Gettext-Domain=your_app

You can copy any .desktop file from /usr/share/applications so pick the one that closest resembles the application you’re adding. Below you can see komodo added to mine:

Komodo has been added to my 'Open With' list
Komodo has been added to my ‘Open With’ list

Read More »

Posted (Updated ) in Linux, PHP

I’ve been seeing up an Amazon EC-2 server with Debian Squeeze and used tasksel to install Web Server and Mail Server. Like all things debian, this worked pretty well after the installation completed and everything ‘just worked’ however I wasn’t happy with the default from name and email address assigned to emails sent by PHP – www-data <www-data@my.domain.com>.

I discovered a quick and simple fix to change these defaults for all mail sent with PHP:

Open /etc/php5/apache2/php.ini and set

sendmail_path = '/usr/sbin/sendmail -t -i -fno-reply@my.domain.com -Fno-reply'

You can see a list of sendmail arguments and what they do here.

Restart apache and you’re good to go:

sudo service apache2 restart

Read More »

Posted in Javascript

Anyone attempting to do cross domain AJAX will be familiar with the following message:

XMLHttpRequest cannot load http://domain.com/page.php. Origin http://yoursite.com is not allowed by Access-Control-Allow-Origin.

However if you own the server you’re AJAXing data from, there’s a simple way to make this possible using a callback. Here’s an example:

server.php (On a different domain):

<?php
	$response = 'your response here'.
 
	if ( !isset($_GET['callback']) ) $_GET['callback'] = '';
 
	echo $_GET['callback'] . '('.json_encode(array('response'=>$response)).');';

client.php (with JQuery):

$.getJSON('http://yourdomain.com/server.php?callback=?', function(json) {
	alert( json.response );
});

That’s all there is to it. Remember the ?callback=? URL segment or it won’t work.

Read More »

Posted in Linux, PHP

I’ve been looking for ways to speed up my site recently and came across this interesting article on seamlessly integrating nginx with Apache to handle asset files without requiring a CDN subdomain. This works by checking the requests file extension for .js, .jpg, .pdf etc and if not found, proxies the request to Apache and serves the results.

Benefits

You won’t need to modify all your pages/posts updating asset locations to point to a subdomain! Everything will ‘just work’.

Issues/Drawbacks

There are 2 issues I’ve found with this setup:

  • Because Apache is now running on port 8080, your mod_rewrite redirects will now redirect to that port. You won’t be able to use RedirectMatch anymore, however below is the solution I came up with:
    sudo apt-get install nginx
    sudo nano/etc/nginx/sites-available/default
  • You can no longer use .htaccess redirects for any asset files nginx is serving. Instead, use nginx redirects. Below is an example:
    1
    2
    3
    4
    5
    6
    7
    8
    9
    10
    11
    12
    13
    14
    15
    16
    17
    18
    19
    20
    21
    22
    23
    24
    25
    26
    27
    28
    29
    30
    31
    32
    33
    34
    35
    36
    37
    38
    39
    40
    41
    42
    43
    44
    45
    46
    47
    48
    49
    50
    51
    52
    53
    
    # You may add here your
    # server {
    #	...
    # }
    # statements for each of your virtual hosts
     
    server {
     
    	listen   80; ## listen for ipv4
    	listen   [::]:80 default ipv6only=on; ## listen for ipv6
     
    	server_name  localhost;
    	root /var/www/; 
    	access_log  /var/log/nginx/localhost.access.log;
     
    	# Static Contents
    	location ~* ^.+.(jpg|jpeg|gif|png|ico|css|zip|tgz|gz|rar|bz2|doc|xls|exe|pdf|ppt|txt|tar|mid|midi|wav|bmp|rtf|js)$ {		access_log off;
    		expires 30d;
    	}
     
    	# Dydamic Content forward to Apache
    	location / {
            	proxy_set_header X-Real-IP  $remote_addr;
    	        proxy_set_header Host $host;
            	proxy_set_header X-Forwarded-For $proxy_add_x_forwarded_for;
    	        proxy_pass http://127.0.0.1:8080;	}
    }
     
    ###############################################################################
    # virtualhost
    ###############################################################################
     
    #server {
    #    server_name www.example.com example.com;
    #    root /var/www/example.com/html/;
    #
    #    # Static Contents
    #    location ~* ^.+.(jpg|jpeg|gif|png|ico|css|zip|tgz|gz|rar|bz2|doc|xls|exe|pdf|ppt|txt|tar|mid|midi|wav|bmp|rtf|js)$ {
    #        access_log off;
    #        expires 30d;
    #    }
    #
    #    # Dydamic Content forward to Apache
    #    location / {
    #        proxy_set_header X-Real-IP  $remote_addr;
    #        proxy_set_header Host $host;
    #        proxy_set_header X-Forwarded-For $proxy_add_x_forwarded_for;
    #        proxy_pass http://127.0.0.1:8080;
    #    }
    #}

    For more information on nginx redirects, see the official documentation.

Read More »