If you want your WordPress site to handle large traffic spikes, loading as many assets as possible from a third party server is a no-brainer. One of the ways to do this is by pointing all asset URLs to a subdomain and having that subdomain load through a service like CloudFront using origin pull. This is done in 3 steps:
- Create the CloudFront distribution
- Add the subdomain to your DNS
- The use of a poorly documented WordPress constant.
In this tutorial I’ll be moving all my sites assets from www.flynsarmy.com to static.flynsarmy.com.
Setting up the CloudFront Distribution
We’ll be making use of something called origin pull on CloudFront. This is where when you hit a CloudFront URL, CloudFront will check to see if a cached copy of an asset exists and if not it will download the asset off your site. The cached asset lasts for 24 hours before its flushed and a new asset is downloaded from your server. Origin Pull is an extremely handy feature that takes almost all asset load off your server without requiring any major changes to your server or site configuration.
Let’s get started.
- In the CloudFront AWS Management Console page, click Create Distribution
- We want a web distribution so click the Get Started button under Web
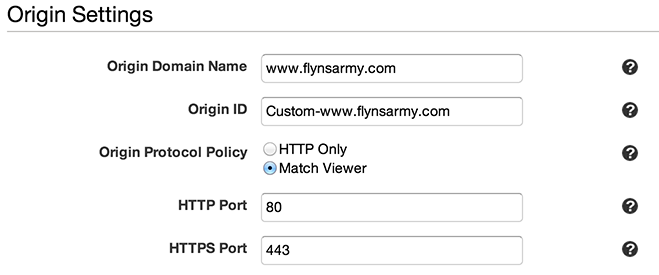
- Origin Settings
Set your origin domain name to your sites primary domain (The domain everyone currently accesses your site – in my case www.flynsarmy.com) and if you use HTTPS at all make sure Match Viewer is checked under Origin Protocol Policy

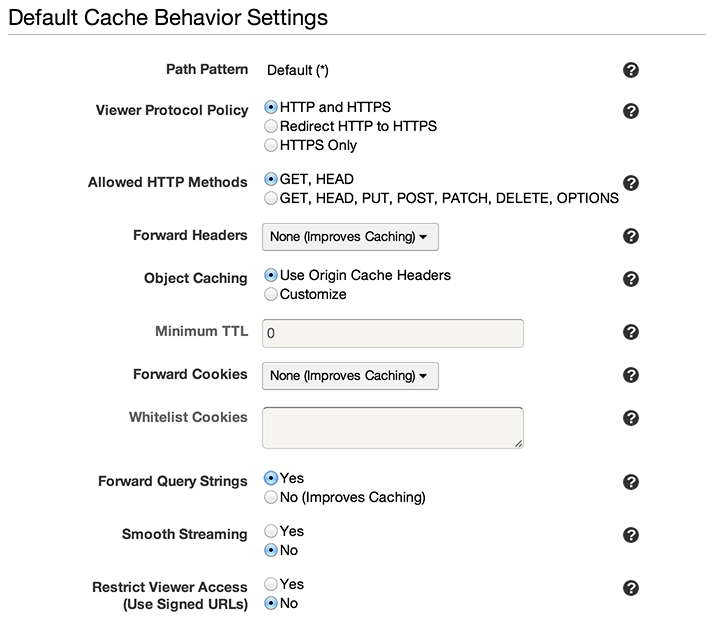
Default Cache Behavior Settings
These can all be left default, though I like to forward query strings so that if I need a new version of an asset served to all site visitors instantly I can just change foo.jpg to foo.jpg?v=2 for example.

Distribution Settings
This is where you enter the subdomain your site will be using to serve assets. Enter it into the Alternate Domain Names (CNAMEs) field. Everything else can pretty much be left default though you may want to provide a Default Root Object so if someone hits http://static.yoursite.com they don’t see an ugly CloudFront XML error

- When done click Create Distribution.
The distribution will start building and be set to In Progress for a few minutes before changing to Enabled and should look something like the following:

Take note of the Domain Name field. You’ll need this value in the next step.
Updating your DNS
With the CloudFront distro created, we now need to set up the static.flynsarmy.com subdomain to point to it. This is done a little differently with every provider but is very simple. In keeping with the AWS theme I’ll demonstrate doing so in Route 53.
- In the Route 53 AWS Management Console page, click Hosted Zones and double click the flynsarmy.com domain.

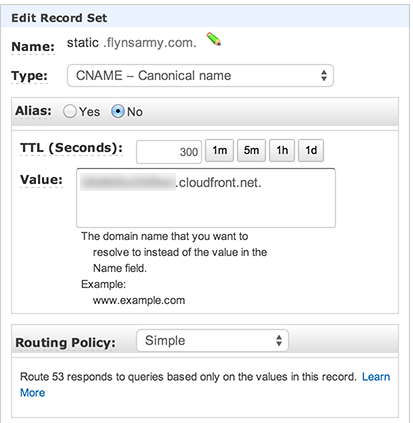
- Click Create Record Set and enter the following details:
Name: static
Type: CNAME
Value: Enter the *.cloudfront.net domain from the Domain Name field in the Cloudfront Distribution you created earlier.
- Click Create
Your DNS will take up to 24 hours to propagate. To know if it’s working on not run a simple dig command:
$ dig static.flynsarmy.com ; <<>> DiG 9.8.3-P1 <<>> static.flynsarmy.com ;; global options: +cmd ;; Got answer: ;; ->>HEADER<<- opcode: QUERY, status: NOERROR, id: 17979 ;; flags: qr rd ra; QUERY: 1, ANSWER: 9, AUTHORITY: 4, ADDITIONAL: 4 ;; QUESTION SECTION: ;static.flynsarmy.com. IN A ;; ANSWER SECTION: static.flynsarmy.com. 300 IN CNAME www.flynsarmy.com. www.flynsarmy.com. 37 IN A 54.230.133.128 www.flynsarmy.com. 37 IN A 54.230.133.137 www.flynsarmy.com. 37 IN A 54.230.133.139 www.flynsarmy.com. 37 IN A 54.230.133.145 www.flynsarmy.com. 37 IN A 54.230.133.161 www.flynsarmy.com. 37 IN A 54.230.133.244 www.flynsarmy.com. 37 IN A 54.230.135.99 www.flynsarmy.com. 37 IN A 54.230.135.100 |
Try to load an asset file that exists on your main domain, replacing www with static at the start. It should now work!
Load all Assets from a Subdomain With WordPress
We’re on to the final step now. We have a working origin pull CloudFront distribution on a static subdomain, we just need WordPress to automatically point to that subdomain for all its assets. This is done with the WP_CONTENT_URL constant.
I couldn’t find any official documentation on this constant, however drop the following into your wp-config.php just above the /* That’s all, stop editing! Happy blogging. */ line.
1 | define('WP_CONTENT_URL', "https://www.flynsarmy.com/wp-content"); |
Refresh your sites frontend. You’ll notice a bunch of your URLs are now using this subdomain. Also if you upload new files using the Add Media link in admin, they will also use the subdomain!
One thing to note though is that all existing uploads will remain as they were. This change only affects newly uploaded assets and a few WordPress URL constants which are derived from WP_CONTENT_URL.
CORS Support
By this point everything should be working great except web fonts which will throw an Access Control error and not render. This is due to Cross Origin Resource Sharing. To fix this drop the following into your .htaccess. You’ll need mod_headers enabled.
1 2 3 4 5 | <FilesMatch "\.(ttf|otf|eot|woff)$"> <IfModule mod_headers.c> Header set Access-Control-Allow-Origin "*" </IfModule> </FilesMatch> |