Posted in Javascript

While playing around with Frontity (a react framework for WordPress) I noticed the compiled bundle size for the default Mars theme was pretty huge clocking in at an unacceptable 390KB of JavaScript. That’s a lot to download before my site will appear. Below I detail how I knocked over 100KB off that size with no discernible difference in functionality simply by swapping out React with its lightweight drop in replacement Preact.

Extending WebPack

To replace React we need to modify Frontity’s webpack configuration. At the time of writing it’s not documented how to do that however a forum post by SantosGuillamot contains a link to a CodeSandbox showing how to do it.

In your root folder’s package.json add the following dependencies:

1
2
3
4
5
6
"dependencies": {
	...
	"change-config": "./packages/change-config",
	"preact": "^10.5.14",
	"preact-render-to-string": "^5.1.19"
}

Create the following files:

  1. /packages/change-config/package.json
  2. /packages/change-config/frontity.config.js

Here’s the contents of package.json:

1
2
3
4
5
6
7
8
9
10
11
{
  "name": "change-config",
  "version": "1.0.0",
  "description": "Frontity package created using the Frontity CLI.",
  "keywords": [
    "frontity",
    "frontity-theme"
  ],
  "license": "Apache-2.0",
  "dependencies": {}
}

And here is frontity.config.js:

1
2
3
4
5
6
export const webpack = ({ config, mode }) => {
    config.resolve.alias["react"] = "preact/compat";
    config.resolve.alias["react-dom/test-utils"] = "preact/test-utils";
    config.resolve.alias["react-dom"] = "preact/compat";
    config.resolve.alias["react/jsx-runtime"] = "preact/jsx-runtime";
};

Now back in your root folder open frontity.settings.js and set the following at the end of the packages section:

1
2
3
4
5
6
7
8
const settings = {
  ...
  "packages": [
    ...,
    "@frontity/tiny-router",
    "@frontity/html2react",
    "change-config"
  ]

That should be it. Run

1
2
npx frontity build
npx frontity serve

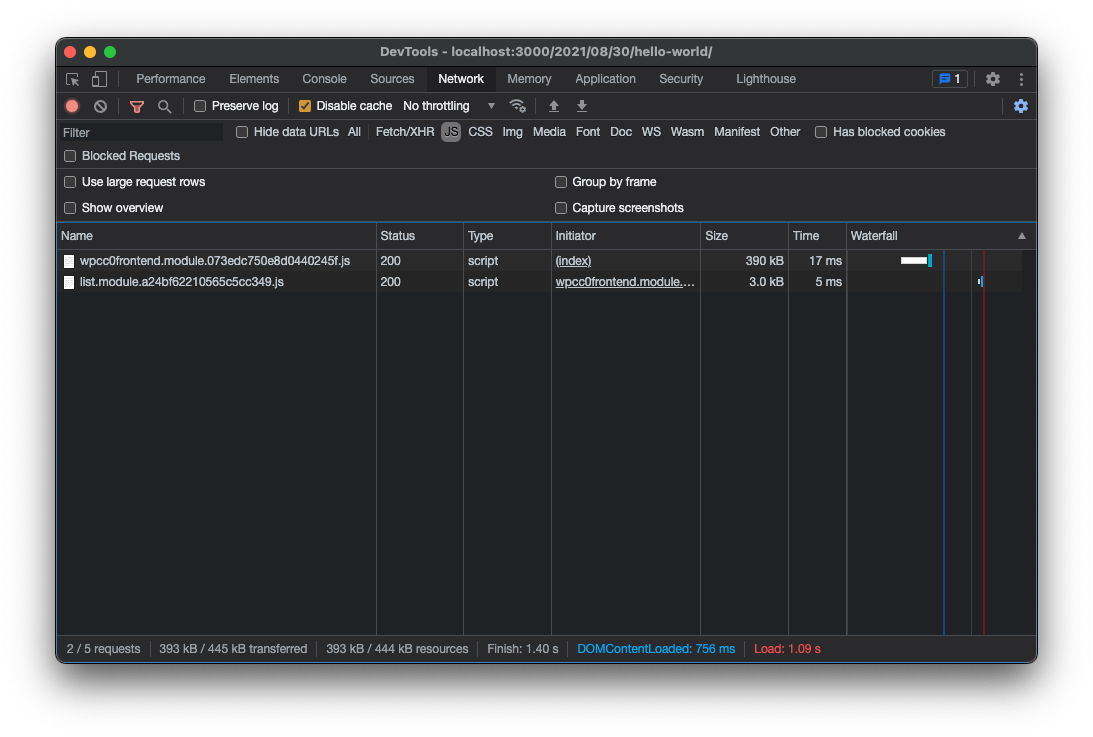
Here are the before and after filesizes:

Before:

Frontity base Mars theme bundle size

After:

Frontity Mars theme bundle size with React replaced with Preact

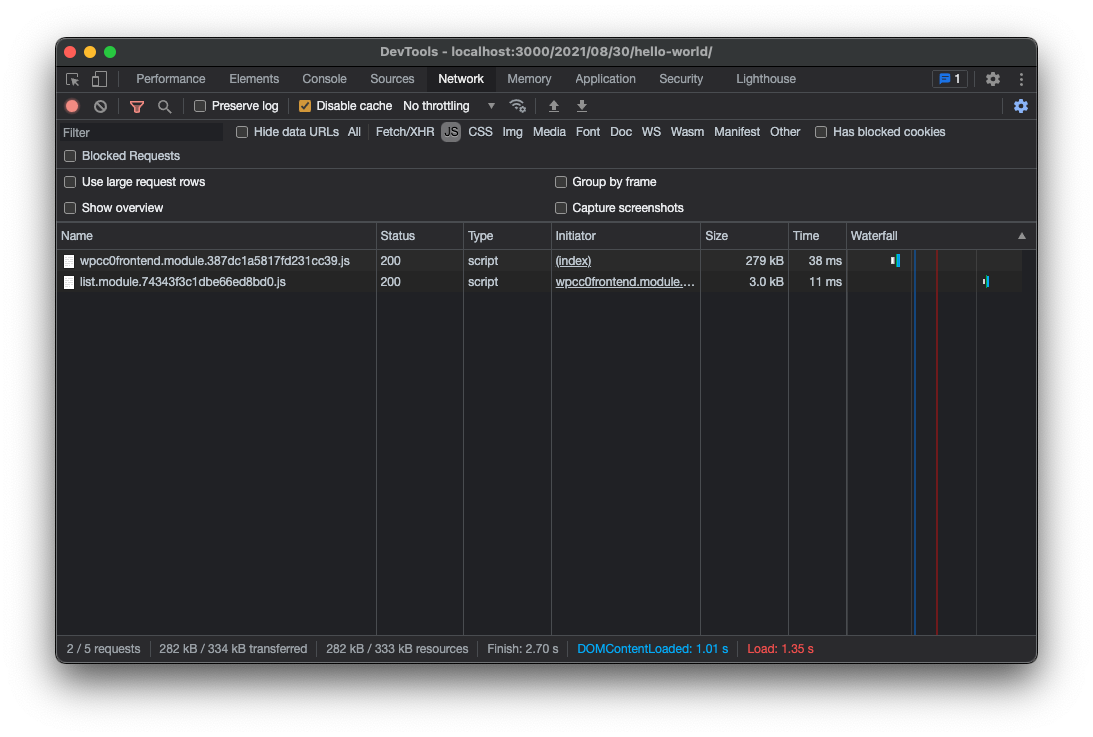
A saving of 110KB! Not too shabby.

Read More »

Posted in Javascript

Custom button added to Gutenberg top panel

Gutenberg may be the shiny new toy available for WordPress admin but it still feels very limiting at times – especially when trying to do things the developers don’t anticipate. I wanted to add an extra button at the top of the post edit page next to the Publish button before finding out there is no SlotFill for this but once again, React has us covered with a handy little helper createPortal. createPortal allows you to place a component anywhere in the DOM of your choosing – perfect for what I wanted to do here.

The Component

Without further adieu, component code below:

1
2
3
4
5
6
7
8
9
10
11
12
13
14
15
16
17
18
19
20
21
22
23
24
25
26
27
28
29
30
31
32
33
34
35
36
37
38
39
40
41
42
43
44
45
46
47
48
49
50
51
52
53
54
55
56
57
58
59
60
61
62
/**
 * WordPress dependencies
 */
import { Button } from '@wordpress/components';
import { compose } from '@wordpress/compose';
import { createPortal, useEffect, useState } from '@wordpress/element';
import { withSelect } from '@wordpress/data';
 
const TopBtn = ( { postPreviewButton } ) => {
	// Empty div element our button will be placed into
	// This div will be inserted before the Publish button with useEffect()
	const [ container ] = useState( document.createElement( 'div' ) );
 
	// The button submit handler
	const onSubmit = () => {
		console.log( 'Button pressed!' );
	};
 
	// Do the actual placing/removing of the button in the DOM
	useEffect( () => {
		// Ensure we have a Preview button to place next to
		if ( ! postPreviewButton ) {
			return;
		}
 
		// Insert our button immediately after the post preview button.
		postPreviewButton.parentNode.insertBefore(
			container,
			postPreviewButton.nextSibling
		);
		// Remove our button on component unload
		return () => {
			postPreviewButton.parentNode.removeChild( container );
		};
	}, [ postPreviewButton ] );
 
	// Use createPortal to place our component into the <div/> container
	return createPortal(
		<>
			<Button
				isSecondary
				showTooltip={ true }
				label="My Custom Button"
				onClick={ onSubmit }
			>
				My Btn
			</Button>
			<span>&nbsp;</span>
		</>,
		container
	);
};
 
export default compose( [
	withSelect( () => {
		return {
			// Provide the Post preview button element so we'll know where to
			// place our component
			postPreviewButton: document.querySelector( '.editor-post-preview' ),
		};
	} ),
] )( TopBtn );

This setup is quite flexible allowing you to add components pretty much anywhere on the page you like. I’ve commented the component as best I could. If you have any questions feel free to ask in the comments section below.

Read More »

Posted (Updated ) in Javascript, PHP

Dropzone is a really nice lightweight javascript upload library with drag drop support and a high level of customisability. The documentation for direct uploads to Amazon S3 with a PHP backend are entirely lacking though so I’ve whipped up a complete tutorial on how to make it happen. For this tutorial I’ll be using Laravel but the script is very simple and any PHP backend will work.


What You’ll Need

  • AWS Access Key
  • AWS Secret Key
  • AWS Region
  • AWS Bucket Name

As part of Laravel I’m using dotenv to store these values and retrieving them with getenv() but they can be stored as config variables or any other method you like.

Read More »

Posted (Updated ) in Javascript

Twitter Bootstrap (3.1.1 at the time of writing) has a handy piece of functionality whereby if you trigger a modal with data attributes on an anchor element, the modal will load its contents from the anchors href attribute. Being able to AJAX load in this way is great, however the first load caches so every subsequent click of the anchor element will show the same modal contents. This can present a problem in some use cases.

Here’s an example of the default functionality:

Notice the dynamically generated date isn’t being updated each time you open the modal? Well if you need the contents to always be reloaded each open, there’s a simple jQuery fix.

1
2
3
$('#myModal').on('hide.bs.modal', function(e) {
	$(this).removeData('bs.modal');
});

And a working demo:

Enjoy!

Read More »

Posted (Updated ) in Javascript, PHP

Imagine you’re running a WordPress Multisite subfolder instance (let’s call it MyNetwork) with a bunch of blogs like so:

mynetwork.com
mynetwork.com/foo
mynetwork.com/bar

Each blog needs to keep track of its page views (including the main blog) but you’d also like page view aggregated statistics for your entire network. This can be done and is surprisingly easy with Google Analytics views and filters. Just follow the below steps and you’ll be on your way.

Read More »

Posted (Updated ) in Javascript

Despite a global shift towards touch-oriented devices on the internet and the existence of a relatively old bug report, Google has decided not to add support for mobile/touch to their ChartRangeFilter for Google Charts (as of the time of writing). See for yourself:

Demo | Source – Doesn’t work on mobile. Frustrating!

This is really annoying, especially if you are dealing with a significant chunk of data that could take advantage of this functionality by allowing users to ‘zoom in’ on specific areas.


A Workaround (For Now)

Although we can’t get the ChartRangeFilter working on mobile, we can display something else instead for mobile devices such as the handy jQRangeSlider. To do so we’ll need to hook into the methods provided by google.visualization.ControlWrapper (which sits around the ChartRangeFilter).

In the source we have:

var controlWrapper = new google.visualization.ControlWrapper({
	controlType: 'ChartRangeFilter',
	...
});

We can update the selection in the ChartRangeFilter by calling the following on its ControlWrapper:

controlWrapper.setState({
	range: {
		start: new Date(2004, 01, 01),
		end: new Date(2006, 01, 01)
	}
});
controlWrapper.draw();

Combine this with a mobile UA check (terrible I know, but you can’t really use browser  feature detection for this) and a DateRangeSlider (I’m using dates on my X axis) and you get the following:

var is_mobile = /Android|webOS|iPhone|iPad|iPod|BlackBerry/i.test(navigator.userAgent);
// ChartRangeFilter doesn't work on mobile. Use a dateRangeSlider to manipulate it
if ( is_mobile )
{
	$('#filter').hide();
	$('#filter_mobile').show();
 
	$( "#filter_mobile" ).dateRangeSlider({
		bounds: {
			min: new Date(2001, 1, 1),
			max: new Date(2013, 3, 1)
		},
		defaultValues: {
			min: new Date(2001, 1, 1),
			max: new Date(2013, 3, 1)
		},
		step: {
			months: 1
		},
		arrows: true,
		wheelMode: null
	}).bind('valuesChanged', function(e, data) {
		controlWrapper.setState({range: { start: data.values.min, end: data.values.max }});
		controlWrapper.draw();
	});
}

Demo

ChartRangeFilter workaround for mobile devices

ChartRangeFilter workaround for mobile devices

Try the demo below. View it on a mobile device (or use a mobile UA string). You get the standard Google Charts ChartRangeFilter for desktop and jQRangeSlider for mobile. Everything works nicely!

Demo | Source – Snazzy mobile-specific date range widget

Read More »

Posted in Javascript

Preface: These APIs are still quite new and subject to change. As of the time of writing, the following tutorial works in Chrome 18.0.1025.168. Firefox 12 supports full screen but not mouse lock.

I’ve been having a little play with some HTML5 features and worked up an example of Pointer Lock and Full Screen APIs. As it stands at the moment, pointer lock is tightly coupled with full screen, so you won’t be able to use it without first loading up full screen mode.

You’ll need to enable Enable Pointer Lock in about:flags in Chrome then restart the browser for mouse lock to work.

You may request full screen mode like so:

1
2
3
4
5
6
element.requestFullScreen =
	element.requestFullScreen    ||
	element.mozRequestFullScreen ||
	element.webkitRequestFullScreen;
 
element.requestFullScreen(element.ALLOW_KEYBOARD_INPUT);

Once in full screen mode, pointer lock should become available:

1
2
3
4
5
6
7
8
9
navigator.pointer = navigator.pointer || navigator.webkitPointer;
navigator.pointer.lock(element,
	function() {
		console.log('Pointer lock');
	},
	function() {
		console.log('No pointer lock');
	}
);

Note in the above two scripts, element is a DOM element

Check out the working demo here. I’ve also added some JS to determine the direction the locked pointer is travelling and output the data to the screen. View page source for details.

Read More »

Posted in Javascript

Anyone attempting to do cross domain AJAX will be familiar with the following message:

XMLHttpRequest cannot load http://domain.com/page.php. Origin http://yoursite.com is not allowed by Access-Control-Allow-Origin.

However if you own the server you’re AJAXing data from, there’s a simple way to make this possible using a callback. Here’s an example:

server.php (On a different domain):

<?php
	$response = 'your response here'.
 
	if ( !isset($_GET['callback']) ) $_GET['callback'] = '';
 
	echo $_GET['callback'] . '('.json_encode(array('response'=>$response)).');';

client.php (with JQuery):

$.getJSON('http://yourdomain.com/server.php?callback=?', function(json) {
	alert( json.response );
});

That’s all there is to it. Remember the ?callback=? URL segment or it won’t work.

Read More »

Posted (Updated ) in Javascript, PHP

Even though it hasn’t worked for quite some time now, my previous PHP WebSocket chat application has garnered quite a bit of attention and is still one of my most heavily trafficked posts. As a result I thought I’d provide you all with a working script as of Feb 15, 2012. Also, because I’m your typical lazy developer, I’ll be building on top of other peoples’ work – most notably PHPWebSocket.

You can download the final script here. According to the Wikipedia article on WebSockets, it should work in IE10+, Firefox 7+ and Chrome 14+. Personally I tested with Chrome 17.0.963.46 and Firefox 10.0.1.

I want to stress that this tutorial is designed to be extremely basic and as such does not give alot of functionality out of the box (but provides all the tools required to add more). It’s simply a working example of a PHP-based WebSocket server.

Read More »