Posted in Uncategorized

For a while now I’ve been having an issue where when I plug my headphones into the headphone jack of my Logitech 5.1 PC speakers, some YouTube and Facebook videos wouldn’t have sound, but most would.

I found this Reddit thread on the topic however the best solution seemed to be:

Hopefully everyone has fixed this by now, however I fixed this by changing my Realtek settings from 7.1 to stereo. – VeryRedChris

I went poking around in my sound settings (Windows 10) and made the following adjustment: Sound – Playback Devices – Speakers (Realtek High Definition Audio) – Properties – Spatial Sound and set Spatial sound format to Windows Sonic for Headphones and made sure Turn on 7.1 virtual surround sound checkbox was checked. This fixed the issue! If you have Chrome open, restart it and any other existing audio apps for the changes to take affect.

Read More »

Posted in Linux

I’ve been trying to clone a private git repository from BitBucket and getting the response:

$ git clone git@bitbucket.org:my/repo.git
Cloning into ‘repo’…
Permission denied (publickey).
fatal: Could not read from remote repository.

There are two things that need to be done to fix this.


Add your SSH Key to BitBucket

Firstly, make sure your git server has your SSH key. I’m using BitBucket so as per their documentation:

1
2
ssh-keygen
cat ~/.ssh/id_rsa.pub

Copy and add your key to Settings – SSH Keys area in BitBucket.


Add your Key to the SSH Agent

If this still isn’t enough to fix the above error you may need to add your new key to your machines SSH agent.

1
2
3
4
5
# Make sure SSH agent is running
eval `ssh-agent -s`
 
# Add your key to the agent
ssh-add ~/.ssh/id_rsa


Give it a try now and you should be all good. Thanks to Srikanth Kondaparthy and user456814 for their helpful posts on Stack Overflow.

Read More »

Posted in Uncategorized

Our firewall at work restricts us to only port 80 and no access to SSH – which as you can imagine for a web developer is a pretty big issue. Below I’ll describe the various methods of routing around this crap.


Create a SOCKS5 Proxy with SSH

If your firewall restricts which sites you can visit but you have access through SSH to a remote server, route your browser and other traffic through that server with a SOCKS5 proxy. This is called Dynamic Port Forwarding:

1
ssh -f -N -D 1080 remote-server

The above command creates a SOCKS5 proxy server on port 1080 of your machine which sends all traffic through remote-server. 

Use it with you browser:

Now use the server in Firefox:

  • go to Edit -> Preferences -> Advanced -> Network -> Connection -> Settings…
  • check “Manual proxy configuration”
  • make sure “Use this proxy server for all protocols” is cleared
  • clear “HTTP Proxy”, “SSL Proxy”, “FTP Proxy”, and “Gopher Proxy” fields
  • enter “127.0.0.1” for “SOCKS Host”
  • enter “1080” (or whatever port you chose) for Port.

Use it with git:

You can also configure SSH git origins to work with your proxy:

Open ~/.ssh/config and add

1
2
3
Host bitbucket.org
    User git
    ProxyCommand nc -x localhost:1080 %h %p

Now you can just clone/push/pull as normal. See here for more information.

Read More »

Posted (Updated ) in Uncategorized

Recording a gif on OSX is fairly easy but you’ll need a few tools to make it happen – especially if you want a nice, small filesize for online viewing.


Step 1 – Record a video

You can use anything for this – I was recording a window on my screen so I used Screenium but Quicktime works fine. The output was a 15 second 1.1MB MOV file of resolution 1184×738. I saved the file as demo.mov on my desktop.


Step 2 – Convert to a Slideshow of PNGs

  • 1
    
    brew install ffmpeg #if you don't already have it
  • 1
    
    mkdir output
  • 1
    
    ffmpeg -i demo.mov -vf scale=iw:ih -r 10 output/ffout%3d.png
    • ‘scale=iw:ih’ – Don’t change the input scale. You can also set this to specific values or ‘320:-1’ to rescale down for example
    • ‘-r 10’ – Set to 10 FPS
    • ‘output/ffout%3d.png’ output slideshow of pngs in output folder


Step 3 – Convert the Slideshow to a GIF

From our PNG slideshow we can generate a (huge) gif. Don’t worry, we’ll fix the filesize later.

  • 1
    
    brew install imagemagick #if you don't already have it
  • 1
    
    convert -delay 8 -loop 0 output/ffout*.png output/demo.gif
    • ‘convert’ is the command-line tool from ImageMagick
    • ‘-dalay’ is the delay of 8, you would get a FPS=100/8=12.5
    • ‘-loop’ adds Netscape loop extension to your GIF animation
    • ‘output/ffout*.png’ is the directory and file names going into the GIF
    • ‘output/animation.gif’ is the final location and GIF output


Step 4 – Optimise your GIF with Photoshop

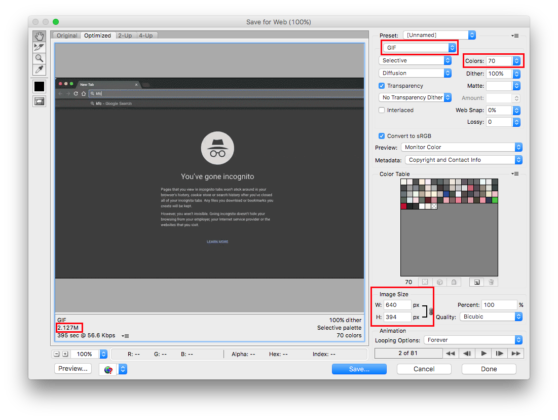
  • Drag your new gif into Photoshop. Here you can make any changes such as removing frames. Turning on Window – Timeline will help here.
  • File – Save for Web and select GIF from the image type drop down at the top right
  • Tweak your Image Size and Colors values until you get the filesize you want (shown at bottom left). You can preview the GIF in realtime using the media buttons at the bottom right.
  • If the filesize is still too large, return to step 2 and lower your gifs FPS by lowering the r value.
  • Optimising your GIF with Photoshop


References

Read More »

Posted in PHP

Say you’re pooling requests in Guzzle and want the responses to have access to data such as the request URL. Guzzle doesn’t currently allow for this but that’s all fixed with the help of a simple middleware class.


Usage

When requesting a URL with GuzzleHttp\Client, pass a RESPONSE_META array in your requests second argument like so:

1
2
3
4
5
6
$client->get($url, [
    'RESPONSE_META' => [
        'url' => $url,
        'some_data' => 'foo',
    ],
]);

The data is attached as a header to the response. Access it like so: (Remembering to prepend X-GUZZLE-META- to your key)

1
$some_data = $response->getHeaderLine('X-GUZZLE-META-some_data');


Complete Example

1
2
3
4
5
6
7
8
9
10
11
12
13
14
15
16
17
18
19
20
21
22
23
24
25
26
27
28
29
30
31
32
33
34
35
36
$names = ['Alpha', 'Beta', 'Charlie', 'Delta'];
$stack = GuzzleHttp\HandlerStack::create();
$stack->push(GuzzleResponseMetaMiddleware::middleware());$client = new GuzzleHttp\Client([
    'handler' => $stack]);
$requests = function() use ($client, $names) {
    foreach ( $names as $name )
    {
        $url = "Http://mydomain.com/?name=".$name;
 
        yield function() use ($client, $url, $name) {
            return $client->getAsync($url, [
                'RESPONSE_META' => [                    'url' => $url,                    'name' => $name,                ],            ]);
        };
    }
};
$pool = new GuzzleHttp\Pool($client, $requests(), [
    'concurrency' => 5,
    'fulfilled' => function (Psr\Http\Message\ResponseInterface $response, $index) {
        $url = $response->getHeaderLine('X-GUZZLE-META-url');        $name = $response->getHeaderLine('X-GUZZLE-META-name'); 
        // do something with this info
    },
]);
 
// Initiate the transfers and create a promise
$promise = $pool->promise();
 
// Force the pool of requests to complete.
$promise->wait();

Read More »

Posted in Database

This post will be a short and sweet one. Copying/cloning a database between mysql hosts in a single command can be done with:

1
mysqldump -h old_host -u old_user -p old_password old_db_name | mysql -h new_host -u new_user -p new_password new_db_name

Note that this will dump the entire database down to your machine before re-uploading it to the new machine.

Read More »

Posted in Linux, PHP

Isn’t it annoying when you want to connect to your home network while out and about but don’t know what your IP is? Sick of dynamic DNS sites with arbitrary restrictions on their free tiers? Well look no further! This tutorial demonstrates how to point your home IP to a subdomain of your website using a simple PHP script.


The Concept

  • Set up a Route 53 subdomain for pointing to your home
  • A device in your home uses a scheduled task to ping a URL on your website
  • That URL grabs the IP hitting it and points your subdomain to the IP.

Read More »

Posted in Uncategorized

I have a folder of MKVs with audio tracks I don’t need. To remove them all at once without needing to reencode every file, we can use the mkvmerge tool from MKVToolnix. This is done in two steps:


Determine which tracks you want to keep

Use mkvinfo to list all tracks and their IDs so you’ll know which you want to keep:

1
mkvinfo -g your_file.mkv

You’ll need a list of track IDs you want to keep.

In the event that some of your MKVs have a different number of tracks to others, you’ll want to do something like the following:

1
for f in *.mkv; do echo "$f" && mkvinfo "$f" | grep "mkvextract: 10"; done

The above will find all MKVs with 10 tracks. In my case I grouped all the MKVs with 10, 8 and 7 tracks into individual folders then performed the below step on each folder.


Remove the tracks from each file

Use the following command to create a copy with a v2 suffix of each MKV. This is a safe way to ensure your changes are correct without deleting the original files.

1
for f in *.mkv; do mkvmerge -o "${f%.mkv} v2.mkv" -a 0,1,2,9,10 "$f"; done


That’s it! When you’re done, delete your original files and remove the v2 suffix from your new ones.

Read More »

Posted in PHP

WordPress offers no way out of the box to grab your sidebar widget settings and use them somewhere else in your site. Here’s a function to allow you to do it:

1
2
3
4
5
6
7
8
9
10
11
12
13
14
15
16
17
18
19
20
21
22
23
24
25
26
27
28
29
30
31
32
33
34
35
36
37
38
39
40
41
42
43
44
45
46
47
48
49
/**
 * Find a given widget in a given sidebar and return its settings.
 * 
 * Example usage:
 * $options = [];
 * try {
 *    $options = get_sidebar_widget_options('sidebar-1', 'recent-comments');
 * } catch (Exception $e) {}
 *
 * @param $sidebar_id    The ID of the sidebar. Defined in your register_sidebar() call
 * @param $widget_type   Widget type specified in register_sidebar()
 * @return array         Saved options
 * @throws Exception     "Widget not found in sidebar" or "Widget has no saved options"
 */
function get_sidebar_widget_options($sidebar_id, $widget_type)
{
    // Grab the list of sidebars and their widgets
    $sidebars = wp_get_sidebars_widgets();
    // Just grab the widgets for our sidebar
    $widgets = $sidebars[$sidebar_id];
 
    // Get the ID of our widget in this sidebar
    $widget_id = 0;
    foreach ( $widgets as $widget_details )
    {
        // $widget_details is of the format $widget_type-$id - we just want the id part
        if ( preg_match("/^{$widget_type}\-(?P<id>\d+)$/", $widget_details, $matches) )
        {
            $widget_id = $matches['id'];
            break;
        }
    }
 
    // If we didn't find the given widget in the given sidebar, throw an error
    if ( !$widget_id )
        throw new Exception("Widget not found in sidebar");
 
    // Grab the options of each instance of our $widget_type from the DB
    $options = get_option('widget_' . $widget_type);
 
    // Ensure there are settings to return
    if ( !isset($options[$widget_id]) )
        throw new Exception("Widget has no saved options");
 
    // Grab the settings
    $widget_options = $options[$widget_id];
 
    return $widget_options;
}

Drop the function in your functions.php. Note that it will find the first occurrence of your given widget in the given sidebar and return its settings.

Read More »

Posted (Updated ) in Linux

I want to schedule backups of my Ubuntu EC2’s EBS on a daily rolling schedule – ie a backup will occur once each day, and after 7 days the oldest snapshot is deleted – so there will always be 1 weeks worth of backups.

Read on for the implementation.

Read More »