This printer is kind of annoying to get working so I thought I’d quickly document how to do it. Here are the steps I took. For reference, I have my printer connected to my router (a Fritzbox) via USB so it’s available to everyone on the network.
Download the Fuji Xerox DocuPrint CM205FW drivers (yes the model is slightly different, but they’ll work). Right click the .inf file and install.
Check Add a printer using IP address or hostname and hit next.
Device Type: TCP/IP Device Hostname or IP Address: 10.0.0.138 (or whatever your routers IP is) Port name: 10.0.0.138 (Same IP as above. No idea why you need an IP instead of a port here) Uncheck ‘Query the printer and automatically select the driver to use’.
Wait for windows to fail to detect the printer then change the Device Type drop down to Fuji Xerox DocuPrint. Hit next.
On the Install the printer driver screen select Fuji Xerox – FX DocuPrint CM205 fw. Hit next twice.
Check ‘Do not share this printer’, Next and Finish.
Back in the Printers and Scanners window click the new printer, select Printer Properties. Select the checked 10.0.0.138 row and click Configure Port.
Change protocol to Raw and uncheck SNMP Status Enabled. Hit OK.
Thanks to this post on whirlpool forums for the drivers.
Mastodon is shaping up to be a real Twitter alternative contender especially in the tech-sphere so I wanted to try my hand at running my own instance in Docker. The experience for getting it up and running turned out to be the most streamlined but hopefully this guide will make things a little easier for others in the future.
For reference I’ve used this guide to install a local dev copy on my Macbook Pro as well as a production Ubuntu server.
As the proud owner of a Swann NVR-7090 4 security camera system, I’ve always had a passionate distaste for the SwannView Plus app. Not only is the app itself terribly made with a non-standard and unintuitive tooltip-free UI, but it’s also not even mentioned on the official Swann website outside of some random support threads. There is a Windows version that hasn’t been updated in years, and an OSX version that is 32-bit only and doesn’t work on modern versions of OSX. This set of cameras does not work in any of the other SwannView apps (Why are there so many of them? They all do the same job!). Argh! The one light at the end of the tunnel is that this system supports being streamed over the RTSP protocol allowing us access with more modern apps such as VLC. There’s a few things you’ll need to go do get everything working and I’ve done my best to describe every step in detail below.
The parameter -days 390 sets the number of days, this certificate is valid. Starting on September 1st (2020), SSL/TLS certificates cannot be issued for longer than 13 months (397 days).
If this time is too long, you will receive an NET::ERR_CERT_VALIDITY_TOO_LONG error. In the command above, this value was set to 390 days, which works for me.
Step 2: Define domains and subdomains that should be included in the certificate
For this, just create a text file named vhosts_domains.ext and insert the following contents:
This example includes subdomains for a local development environment for the domain mixable.blog.local and all subdomains like www.mixable.blog.local or apps.mixable.blog.local.
If you plan to use a more general certificate e.g. to include all subdomains under ..blog.local, this will not work. The definition only supports ‘first level’ subdomains. It would be great, because this saves a lot of additional setup, but unfortunately this is note supported.
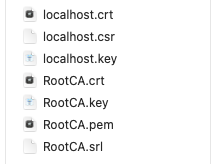
Calling the two commands above will create the localhost certificate that includes all the provided domains and subdomains. Your file listing should look like this:
Step 4: Make the certificate available for Apache
Depending on your system, copy all those files into the the configuration folder of the Apache installation. In my case, the installation was done with the help of brew, so the local path is:
<code>/usr/local/etc/httpd/cert/</code>
At the end, it’s not important where those files are located, because we no add this path to the vhost definitions. For this, open your vhosts file and link the crt and the key file as follows:
If you have additional vhost definitions, you can add the part to every server name entry and use the correct paths to SSLCertificateFile and SSLCertificateKeyFile.
After changing the vhost settings, it is required to restart your Apache server!
Step 5: Add the certificates to macOS
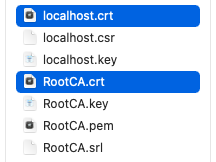
When opening a local website, the certificate should be used but you might see a NET::ERR_CERT_INVALID error. This is the case, because modern browsers/systems do not trust self-signed certificates by default. to overcome this issue, we have to add the created certificates to the macOS Keychain Access. For this, open the *.crt files in Keychain Access:
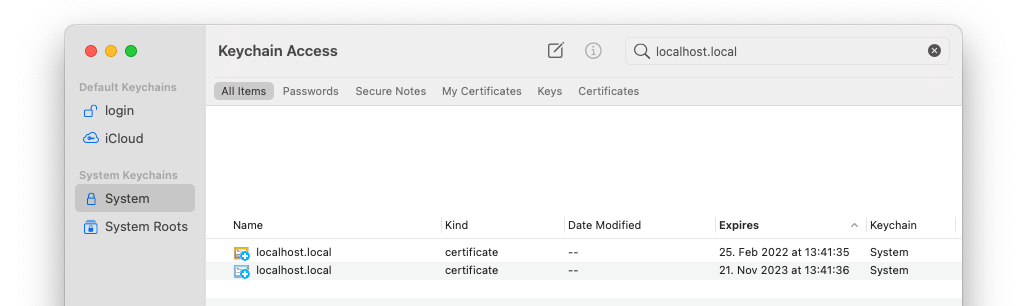
So that they are know by macOS:
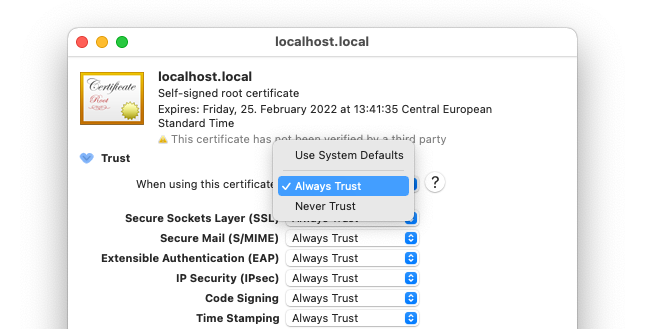
And finally, update the trust settings of each certificate to “Always trust”:
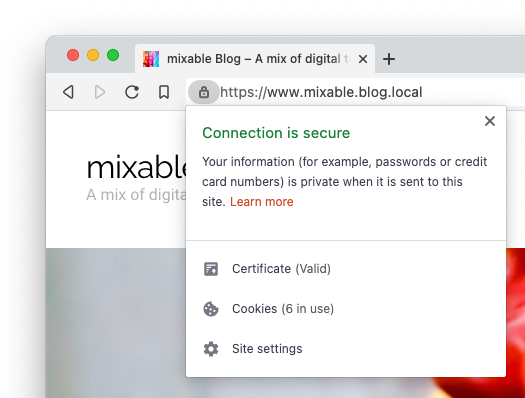
You should now be able to use a secure connection between your browser and your local server:
Step 6: Additional fixes
The steps above might already work for Chrome and Safari. If you have problems with Firefox, just open settings and go to Privacy & Security. Then you have to import the root certificate file RootCA.crt, so that Firefox knows about your certificate.
With Elden Ring saving every step you take and stories of hackers destroying save files with various exploits it’s important to keep a healthy backup schedule. For that reason I’ve whipped up an improved version of my Subnautica backup script for Elden Ring.
This script will check if Elden Ring is running, and if so, will zip the save folder to whatever folder the script is located.
@echo off

:loop

rem Determine if Elden Ring is running
tasklist /fi "ImageName eq eldenring.exe" /fo csv 2>NUL | find /I "eldenring.exe">NUL

rem Save the current datetime to a var https://stackoverflow.com/a/203116
For /f "tokens=2-4 delims=/ " %%a in ('date /t') do (set mydate=%%c_%%a_%%b)
For /f "tokens=1-2 delims=/:" %%a in ("%TIME%") do (set mytime=%%a_%%b)
set mydatetime="%mydate%__%mytime%"

rem If Elden Ring is running...
if "%ERRORLEVEL%"=="1" (
	rem Set up a folder name for our new backup
	SET stamp=backup-%mydatetime%.zip

	rem Back up with Windows 10 'tar.exe' https://superuser.com/a/1473257
	tar.exe -a -cf "%stamp%" "%USERPROFILE%\AppData\Roaming\EldenRing" 2> NUL

	echo [%TIME%] Backed up to %stamp%
) else (
	echo [%TIME%] Not running...
)

rem sleep for 30 minutes https://serverfault.com/a/432323
timeout /t 1800 /nobreak

goto loop
The latest version of this code is available over on my GitHub page. It requires no external tools to run, just Windows 10 or newer.
To run the script simply save the above code into a file with a filename like backup.bat and double click it. Run it whenever you’re playing and close it when you’re done.
After an unfortunate incident involving a crash and a lost save file, I decided to write a batch script to automatically back up my Subnautica 2 saves every x number of minutes. You’ll need 7-Zip and PowerShell installed.
This script will check if Subnautica 2 is running, and if so, will zip the Subnautica save folder to whatever folder the script is located.
@echo off

:loop

rem Get HH:MM:SS for log prefix
FOR /F "tokens=* USEBACKQ" %%F IN (`powershell get-date -format ^"{HH:mm:ss}^"`) DO (
	SET logtime=%%F
)

rem Determine if subnautica is running
tasklist /fi "ImageName eq SubnauticaZero.exe" /fo csv 2>NUL | find /I "SubnauticaZero.exe">NUL

rem If subnautica is running...
if "%ERRORLEVEL%"=="0" (

	rem Get current datetime https://stackoverflow.com/a/2854857
	FOR /F "tokens=* USEBACKQ" %%F IN (`powershell get-date -format ^"{yyyy_MM_dd_HH_mm_ss}^"`) DO (
		SET mydatetime=%%F
	)

	rem Set up a folder name for our new backup
	SET stamp=slot0000-%mydatetime%.zip

	rem Back up with 7zip
	"C:\Program Files\7-Zip\7z.exe" a -tzip "%stamp%" "%USERPROFILE%\AppData\LocalLow\Unknown Worlds\Subnautica Below Zero\SubnauticaZero\SavedGames\slot0000" > NUL

	echo [%logtime%] Backed up to %stamp%
) else (
	echo [%logtime%] Not running...
)

rem sleep for 30 minutes https://stackoverflow.com/a/16803409
powershell -command "Start-Sleep -s 1800"

goto loop
To run the script simply save the above code into a file with a filename like backup.bat and double click it. Run it whenever you’re playing and close it when you’re done.
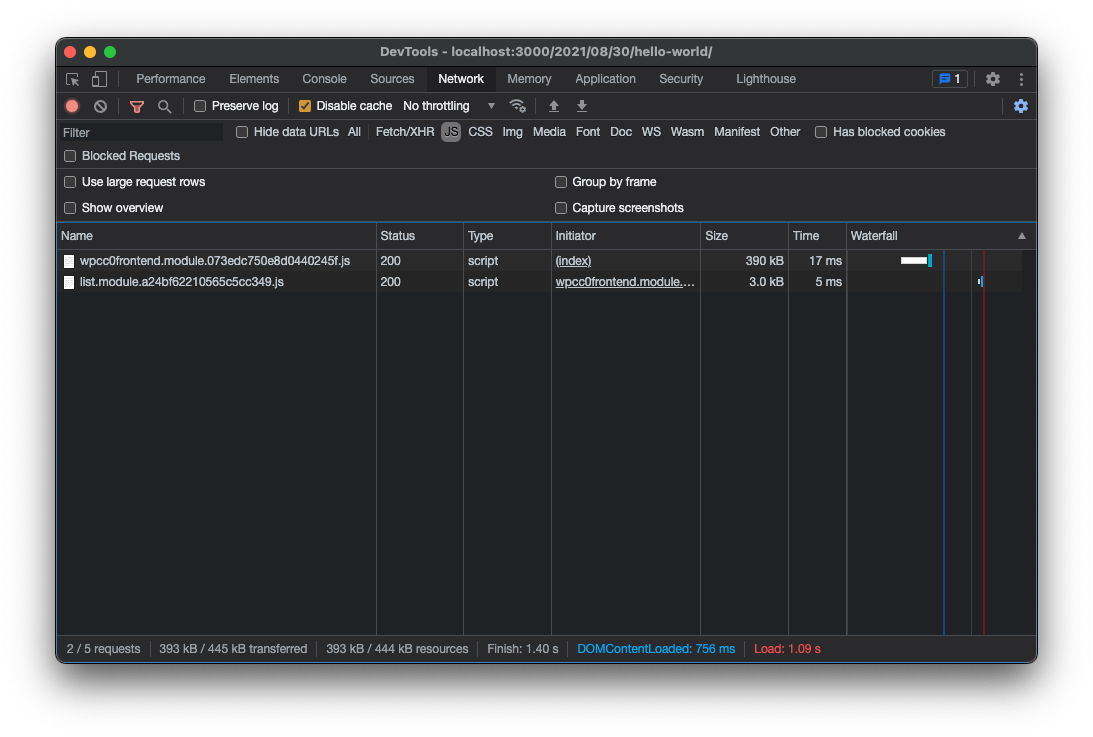
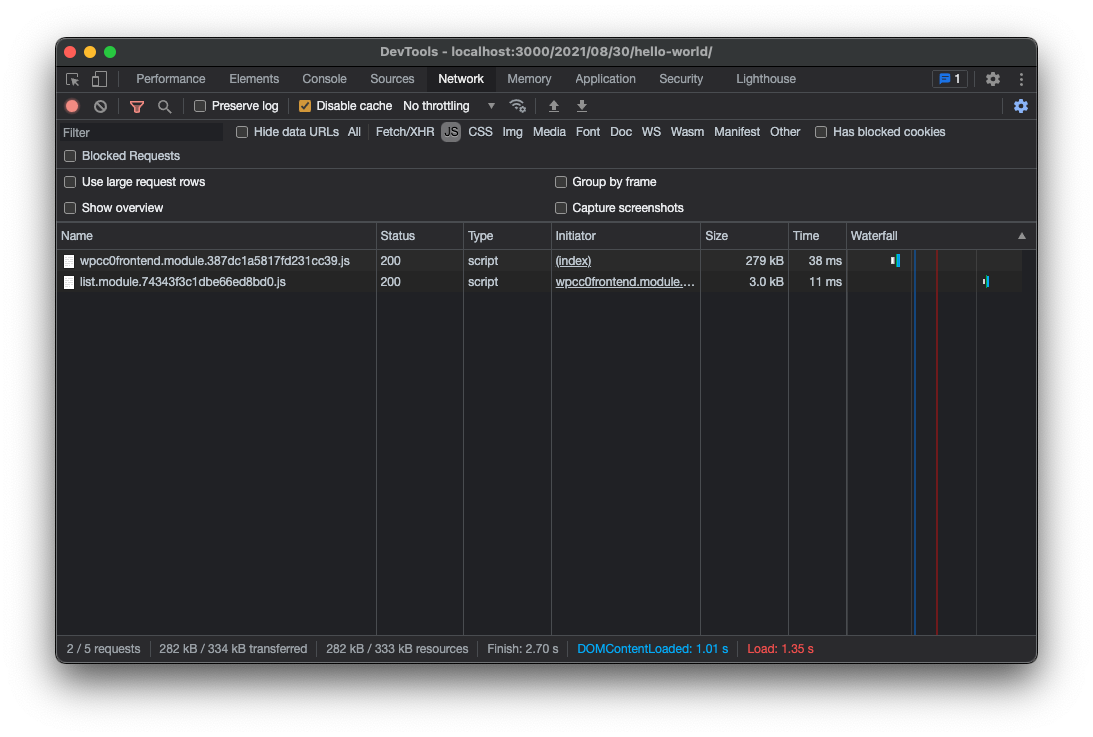
While playing around with Frontity (a react framework for WordPress) I noticed the compiled bundle size for the default Mars theme was pretty huge clocking in at an unacceptable 390KB of JavaScript. That’s a lot to download before my site will appear. Below I detail how I knocked over 100KB off that size with no discernible difference in functionality simply by swapping out React with its lightweight drop in replacement Preact.
Extending WebPack
To replace React we need to modify Frontity’s webpack configuration. At the time of writing it’s not documented how to do that however a forum post by SantosGuillamot contains a link to a CodeSandbox showing how to do it.
In your root folder’s package.json add the following dependencies:
For something that should be simple, importing a model from VRoid Studio into Unreal Engine 4 as of the time of writing is extremely convoluted and time consuming – even with the great tools that have been created to speed up the process.
Below I’ll attempt to walk through every step I took to get things looking and working correctly as well as documenting my struggles along the way. Our basic workflow will be VRoid -> Blender -> Unreal.
I should note that as of the time of writing, the latest version of each of the pieces of software I’ll be using are as follows:
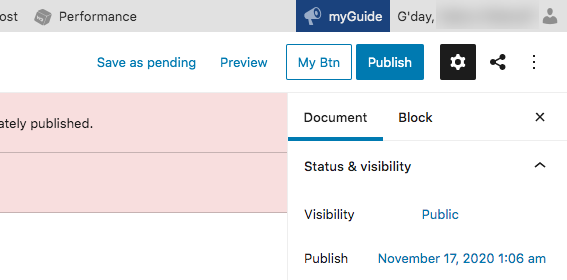
Gutenberg may be the shiny new toy available for WordPress admin but it still feels very limiting at times – especially when trying to do things the developers don’t anticipate. I wanted to add an extra button at the top of the post edit page next to the Publish button before finding out there is no SlotFill for this but once again, React has us covered with a handy little helper createPortal. createPortal allows you to place a component anywhere in the DOM of your choosing – perfect for what I wanted to do here.
The Component
Without further adieu, component code below:
/**
 * WordPress dependencies
 */
import { Button } from '@wordpress/components';
import { compose } from '@wordpress/compose';
import { createPortal, useEffect, useState } from '@wordpress/element';
import { withSelect } from '@wordpress/data';

const TopBtn = ( { postPreviewButton } ) => {
	// Empty div element our button will be placed into
	// This div will be inserted before the Publish button with useEffect()
	const [ container ] = useState( document.createElement( 'div' ) );

	// The button submit handler
	const onSubmit = () => {
		console.log( 'Button pressed!' );
	};

	// Do the actual placing/removing of the button in the DOM
	useEffect( () => {
		// Ensure we have a Preview button to place next to
		if ( ! postPreviewButton ) {
			return;
		}

		// Insert our button immediately after the post preview button.
		postPreviewButton.parentNode.insertBefore(
			container,
			postPreviewButton.nextSibling
		);
		// Remove our button on component unload
		return () => {
			postPreviewButton.parentNode.removeChild( container );
		};
	}, [ postPreviewButton ] );

	// Use createPortal to place our component into the <div/> container
	return createPortal(
		<>
			<Button
				isSecondary
				showTooltip={ true }
				label="My Custom Button"
				onClick={ onSubmit }
			>
				My Btn
			</Button>
			<span> </span>
		</>,
		container
	);
};

export default compose( [
	withSelect( () => {
		return {
			// Provide the Post preview button element so we'll know where to
			// place our component
			postPreviewButton: document.querySelector( '.editor-post-preview' ),
		};
	} ),
] )( TopBtn );
This setup is quite flexible allowing you to add components pretty much anywhere on the page you like. I’ve commented the component as best I could. If you have any questions feel free to ask in the comments section below.
For the longest time now I’ve been having issues with certbot not being able to create a certificate for my domain, returning the error
Attempting to renew cert (mydomain.com) from /home/ubuntu/.certbot/config/renewal/mydomain.com.conf produced an unexpected error: Failed authorization procedure. mydomain.com (http-01): urn:ietf:params:acme:error:unauthorized :: The client lacks sufficient authorization :: Invalid response from https://mydomain.com/.well-known/acme-challenge/-jYlHtpK6x6LZ8B4KjHeY7RgchNFPoouXADS_XQtowc [2606:4700:3035::681c:1e6e]: “<!DOCTYPE html>\n<!–[if lt IE 7]> <html class=\”no-js ie6 oldie\” lang=\”en-US\”> <html class=\”no-js “. Skipping.
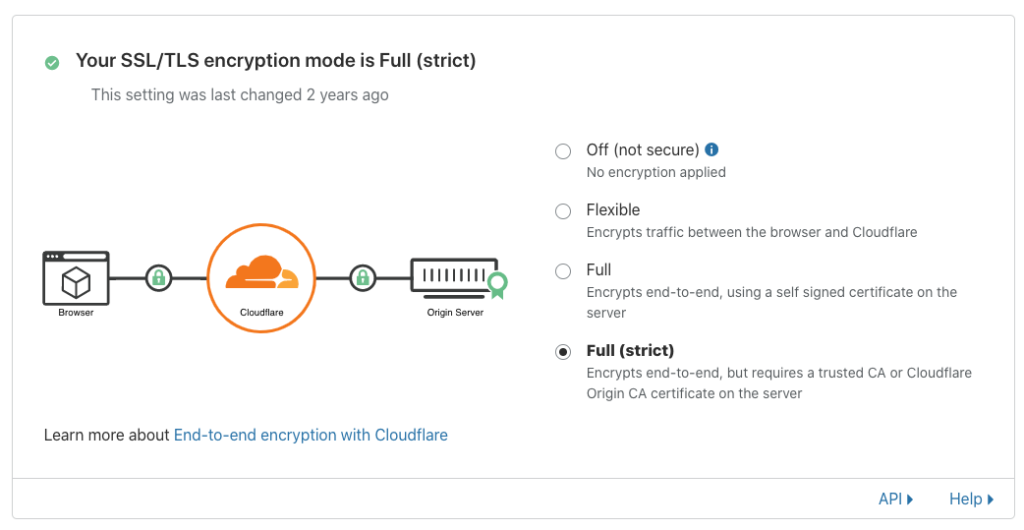
I think the reason for this is because I’m using Full (Strict) encryption mode in CloudFlare dashboard which requires a valid SSL certificate be present when communicating between my web server and CloudFlare.
Full (strict) SSL/TLS encryption mode with CloudFlare
The solution for this is instead of using certbot’s default authentication method, we instead make use of the certbot-dns-cloudflare plugin that will handle the Lets Encrypt challenge through DNS. This works by automatically creating and deleting our CloudFlare DNS TXT record for us during the certbot renew. Let’s set this up now.