Posted (Updated ) in Uncategorized

It seems OSX 10.9 comes with a “feature” (previously off by default) whereby after 2 minutes on battery (the default display off time) the machine goes to sleep. This of course kills the wi-fi resulting in constant dropping of SSH connections, reconnection to IM clients (spamming friends) and a host of other internet related issues. It was badly thought out, badly implemented and just an all around bad choice.

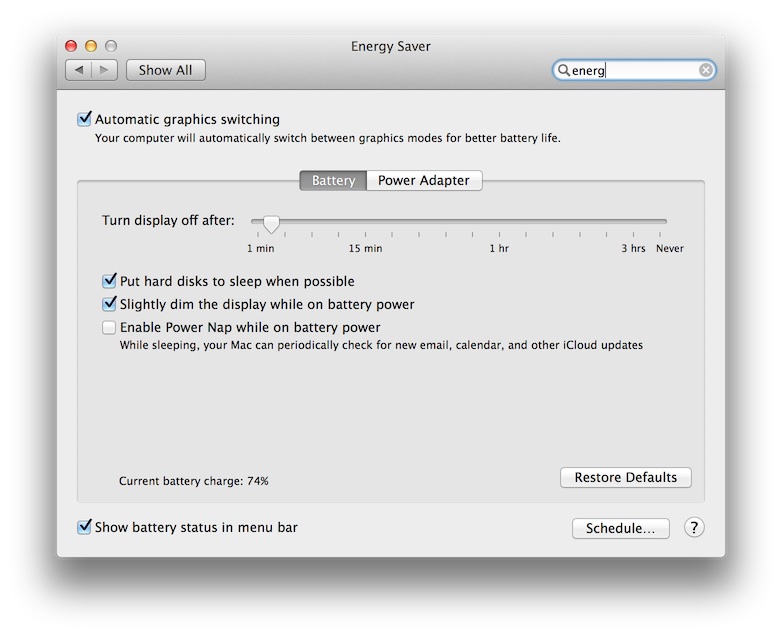
In previous iterations of OSX there were two sliders; one for how long before putting the computer to sleep and the other for putting the display to sleep. Here’s a screenshot of the Energy Saver options in 10.9. Noticed the two have been unhelpfully merged:

Energy Saver Preferences in OS-X 10.9


Fixing this behavior is thankfully very simple and requires only a single terminal command:

1
sudo pmset -a sleep 0

Here are my power management settings after the change:

$ pmset -g
Active Profiles:
Battery Power		-1*
AC Power		-1
Currently in use:
 standbydelay         10800
 standby              1
 halfdim              1
 hibernatefile        /var/vm/sleepimage
 darkwakes            0
 gpuswitch            2
 disksleep            10
 sleep                0
 autopoweroffdelay    14400
 hibernatemode        3
 autopoweroff         1
 ttyskeepawake        1
 displaysleep         2
 acwake               0
 lidwake              1

And with that you should be back to having a properly functioning laptop. If you ever need to revert the change for whatever reason, use:

1
sudo pmset -a sleep 1

Read More »

Posted (Updated ) in PHP

Welcome back to my simple to-do application tutorial for Laravel 4. This tutorial is relatively long so I’ve broken it up into multiple posts.

  1. Part 1 – Installation, Database and Routes
  2. Part 2 – Listing Projects and Tasks
  3. Part 3 – Create/Edit/Delete
  4. Part 4 – Validation and Slugs

So far we’ve learned how to install and set up Laravel, set up some project and task nested resources and display them to the user. Create, edit and delete functionality has also been implemented. In this chapter we’ll finish things off by adding form validation and slug management.

Read More »

Posted (Updated ) in PHP

Welcome back to my simple to-do application tutorial for Laravel 4. This tutorial is relatively long so I’ve broken it up into multiple posts.

  1. Part 1 – Installation, Database and Routes
  2. Part 2 – Listing Projects and Tasks
  3. Part 3 – Create/Edit/Delete
  4. Part 4 – Validation and Slugs

So far we’ve learned how to install and set up Laravel, set up some project and task resources and display them to the user. In this chapter we’ll learn how to use Laravel 4 Generator’s form helpers and set up create, edit and delete pages/actions for our resources.


Before you Begin

If you’re a Laracasts member, watch the videos RESTful Forms and Create/Edit Forms. These videos explain far better and in far more detail the concepts below. If you’re serious about learning Laravel I’d highly recommend you sign up.

Read More »

Posted (Updated ) in PHP

Welcome back to my simple to-do application tutorial for Laravel 4. This tutorial is relatively long so I’ve broken it up into multiple posts.

  1. Part 1 – Installation, Database and Routes
  2. Part 2 – Listing Projects and Tasks
  3. Part 3 – Create/Edit/Delete
  4. Part 4 – Validation and Slugs

So far we have a working database complete with test data and a bunch of routes for displaying, editing and deleting our projects and tasks. In this second chapter I’ll cover controllers, models (with relationships), views (including the blade templating language and layouts) and route model binding.

Read More »

Posted (Updated ) in PHP

Laravel may be one of the younger frameworks out there but it’s making ripples in the PHP world. The following post teaches how to build a basic to-do application in Laravel 4. It covers a wide range of concepts, links to relevant learning material where possible and should make for a great introduction to the framework.

This tutorial is relatively long so I’ve broken it up into multiple posts.

  1. Part 1 – Installation, Database and Routes
  2. Part 2 – Listing Projects and Tasks
  3. Part 3 – Create/Edit/Delete
  4. Part 4 – Validation and Slugs

Today will cover installation, configuration, artisan, migration, seeding and routes.


Before you Begin

Before you begin there are a few great resources you should check out.

You won’t get far in the Laravel world without hearing about Jeffrey Way. Jeffrey has perhaps done more for the Laravel community than any other non-core developer. He has produced high-quality, comprehensive video tutorials on almost every aspect of L4, many of which are free to view and aimed at beginners. I would highly recommend you check out the following pieces of his work:

  1. Laravel 4 Mastery – although older (from the L4 beta days), it’s mostly still relevant. Aimed at beginners and quite comprehensive
  2. Laravel From Scratch – in many ways an updated version of Laravel 4 Mastery. Not as comprehensive but a great compliment to the above
  3. Laracasts – Mostly paid for videos of very high quality. New videos are regularly created and one a week is made free.

There are a few other places to find news and information:

  1. The Laravel Twitter feed – for the latest breaking news on L4 development
  2. Laravel.io – Weekly roundups  that gather the latest news and tutorials from around the web. They also do a weekly podcast that often includes the framework author Taylor Otwell
  3. Laravel Packages Registry – good place to go to find some of the best L4 packages
  4. Code Bright – An e-book provided free of charge by framework author Dayle Rees


Project Aim

Our to-do application will consist of one or more projects, each with its own list of tasks. You will be able to create, list, modify and delete both tasks and projects.

In this lesson we will go through:

  1. Installing and setting up Laravel 4
  2. Installing extra packages that will make development easier
  3. Using migrations and seeds
  4. Learning how to use resourceful controllers
  5. Learning how to use views (including the blade templating language and content layouts
  6. Handling model relations

Read More »

Posted in PHP

We’ve been having no end to issues with image scaling in WordPress where an administrator uploads a ridiculously large image and it appears stretched vertically in Internet Explorer.

I looked into this and discovered WordPress was automatically adding width and height attachments onto the inserted image in the admin. This is generally fine as all modern browsers will scale accordingly for smaller windows…but then we have Internet Explorer which will just retardedly scale width but not height resulting in massively stretched images.

The approach I ended up taking to fix it was to scale the automatically generated width and height attributes on the image down before the HTML is inserted into the post in admin. This can be accomplished with the following snippet:

1
2
3
4
5
6
7
8
9
10
11
12
13
14
15
16
17
18
19
20
21
22
23
24
25
26
27
28
29
30
31
32
33
add_filter( 'post_thumbnail_html', 'flyn_apply_max_image_dimenions', 10 );
add_filter( 'image_send_to_editor', 'flyn_apply_max_image_dimenions', 10 );
function flyn_apply_max_image_dimenions( $html ) {
	ini_set('display_errors', true);
	preg_match('/width="(\d+)"\s/', $html, $wmatches);
	preg_match('/height="(\d+)"\s/', $html, $hmatches);
 
	if ( !empty($wmatches[1]) && !empty($hmatches[1]) )
	{
		list($width, $height) = boilerplate_scale_inside($wmatches[1], $hmatches[1], 630, 9999);
		$html = str_replace('width="'.$wmatches[1].'"', 'width="'.$width.'"', $html);
		$html = str_replace('height="'.$hmatches[1].'"', 'height="'.$height.'"', $html);
	}
 
	return $html;
}
 
function flyn_scale_inside( $width, $height, $into_width, $into_height )
{
	$ratio = $into_width / $width;
 
	$width = $into_width;
	$height *= $ratio;
 
	if ( $height > $into_height )
	{
		$ratio = $into_height / $height;
		$height = $into_height;
		$width *= $ratio;
	}
 
	return array($width, $height);
}

Set your maximum width however you please (I’m using 630px in the example above). I chose a height of 9999 so the image would always be scaled nicely to my themes maximum width.

Read More »

Posted in PHP

Today I came across an issue where when uploading large files my $_FILES and $_POST values returned empty arrays. Turns out this is expected (albeit stupid IMO) behavior.

You can test this by uploading a small then a huge file to this relatively simple PHP script:

1
2
3
4
5
6
7
8
9
10
11
12
13
14
15
16
17
18
19
20
<!DOCTYPE html>
<html>
<head>
<title>Upload test</title>
</head>
<body>
	<form action="?submit=true" role="form" method="POST" enctype="multipart/form-data">
		<input name="images" type="file">
		<input type="hidden" name="foo" value="bar">
		<input type="submit">
	</form>
 
	<pre>$_FILES:
<?php print_r($_FILES); ?>
	</pre>
	<pre>$_POST:
<?php print_r($_POST); ?>
	</pre>
</body>
</html>

After uploading a small file your $_FILES variable will contain the file details but with a huge file (one larger than your POST_MAX_SIZE ini setting) it will be empty.

To check if a user has uploaded a file larger than your POST_MAX_SIZE value you need to use the following if statement:

1
2
if ( !empty($_SERVER['CONTENT_LENGTH']) && empty($_FILES) && empty($_POST) )
	echo 'The uploaded zip was too large. You must upload a file smaller than ' . ini_get("upload_max_filesize");

Here is an updated file that will notify the user if the file they uploaded is too large:

1
2
3
4
5
6
7
8
9
10
11
12
13
14
15
16
17
18
19
20
21
22
23
24
25
<!DOCTYPE html>
<html>
<head>
<title>Upload test</title>
</head>
<body>
	<form action="?submit=true" role="form" method="POST" enctype="multipart/form-data">
		<input name="images" type="file">
		<input type="hidden" name="foo" value="bar">
		<input type="submit">
	</form>
 
	<?php		if ( !empty($_SERVER['CONTENT_LENGTH']) && empty($_FILES) && empty($_POST) )			echo 'The uploaded zip was too large. You must upload a file smaller than ' . ini_get("upload_max_filesize");	?> 
	<pre>$_FILES:
<?php print_r($_FILES); ?>
	</pre>
	<pre>$_POST:
<?php print_r($_POST); ?>
	</pre>
</body>
</html>

Read More »

Posted in PHP

Customising your RSS feed in WordPress is relatively easy and comes in two methods: adding rows to the existing feed, or complete customisation. Each is detailed below along with example code snippets.


Adding Rows

If you want to add rows to the default RSS feed for each entry, the best way to do this is with the rss2_item action. In the example below I add an <image> row if my posts have featured images.

1
2
3
4
5
6
7
8
9
10
11
12
13
14
15
16
17
18
19
20
21
22
add_action('rss2_item', function() {
	global $post;
	if ( $post->post_type != 'cctv_image' )
		return;
 
	// Only add rows to feed with post images
	if ( !has_post_thumbnail($post->ID) )
		return;
 
	// Get the featured image URL and dimensions
	$thumbnail_id = get_post_thumbnail_id( $post->ID );
	$result = wp_get_attachment_image_src( $thumbnail_id, 'full' );
 
	// Did an error occur?
	if ( !$result )
		return;
 
	$url = $result[0];
	$width = $result[1];
	$height = $result[2];
	echo "<image width='$width' height='$height'>$url</image>";
});

Now if a post has a featured image, it’s RSS entry will contain the following extra line:

<image width=”640″ height=”480″>http://mysite.com/wp-content/uploads/2013/10/my_image.jpg</image>


Complete Customisation

The above not enough for you? Do you want complete control over what is and isn’t in your feed? Add the following to your functions.php:

1
2
3
4
5
6
7
8
9
10
11
12
13
14
remove_all_actions( 'do_feed_rss2' );
add_action( 'do_feed_rss2', function( $for_comments ) {
	if ( $for_comments )
		load_template( ABSPATH . WPINC . '/feed-rss2-comments.php' );
	else
	{
		if ( $rss_template = locate_template( 'feed-rss2.php' ) )
			// locate_template() returns path to file
			// if either the child theme or the parent theme have overridden the template
			load_template( $rss_template );
		else
			load_template( ABSPATH . WPINC . '/feed-rss2.php' );
	}
}, 10, 1 );

The above allows you to drop a feed-rss2.php file into your theme folder which will be loaded in place of the default RSS template when a visitor hits your RSS feed URL. Put whatever you like in there!

Read More »

Posted (Updated ) in PHP

Another quick set of utility functions. If you wish to restrict WordPress admin to only users with specifics sets of permissions (such as only those higher than subscriber) use the following two actions in your functions.php:

1
2
3
4
5
6
7
8
9
10
11
12
13
14
15
16
17
18
19
20
21
22
/**
 * Remove admin bar for users without adequate permissions
 */
add_action('after_setup_theme', function() { 
	if ( !current_user_can('edit_posts') )
		add_filter('show_admin_bar', '__return_false');	
});
 
/**
 * Redirect users without adequate permissions back to home page
 */
add_action('admin_init', function(){
	if ( !current_user_can('edit_posts') )
	{
		// Only redirect if not an AJAX request
		if ( empty($_SERVER['PHP_SELF']) || basename($_SERVER['PHP_SELF']) != 'admin-ajax.php' )
		{
			wp_redirect( site_url() );
			exit;
		}
	}
});

You can use any permission you like from the Roles and Capabilities section of the documentation to make admin accessible to just the user groups of your choice. There’s even a handy table showing which roles are available to which default user levels.

Read More »

Posted in PHP

You may occasionally want to regenerate image thumbnails in WordPress (such as after changing image quality settings). Here is a handy function that regenerates all thumbnails for a given attachment post

1
2
3
4
5
6
7
8
9
10
11
12
13
14
15
16
17
18
function regenerate_attachment_images( $attachment_id )
{
	// We only want to look at image attachments
	if ( !wp_attachment_is_image($attachment_id) )
		return;
 
	$filepath = get_attached_file( $attachment_id, true );
	$metadata = wp_generate_attachment_metadata( $attachment_id, $filepath );
 
	// Was there an error?
	if ( is_wp_error( $metadata ) )
		$this->die_json_error_msg( $attachment_id, $metadata->get_error_message() );
	if ( empty( $metadata ) )
		$this->die_json_error_msg( $attachment_id, 'Unknown failure reason.' );
 
	// If this fails, then it just means that nothing was changed (old value == new value)
	wp_update_attachment_metadata( $attachment_id, $metadata );
}

The above was taken mostly from the Regenerate Thumbnails plugin with a few modifications of my own.

Example Usage

To regenerate all thumbnails for all images use the following (Warning: This could take a while if you have alot of images and/or image sizes):

1
2
3
4
5
6
7
8
9
10
11
12
13
14
15
16
$images = new WP_Query(array(
	'post_type' => 'attachment',
	'posts_per_page' => -1,
	'post_mime_type' => 'image',
	'suppress_filters' => false,
 
	'offset' => 0,
	'post_status' => 'inherit',
	'ignore_sticky_posts' => true,
	'no_found_rows' => true,
));
 
while ( $images->have_posts() ): 
	$images->next_post();
	regenerate_attachment_images( $images->post->ID );
endwhile;

Read More »